The main purpose of VLC Streamer is to let you stream movies live without having to go through iTunes.
To do this,
Launch VLC Streamer
Tap on the computer you want to connect to
'Add a Movie' and select the file you want
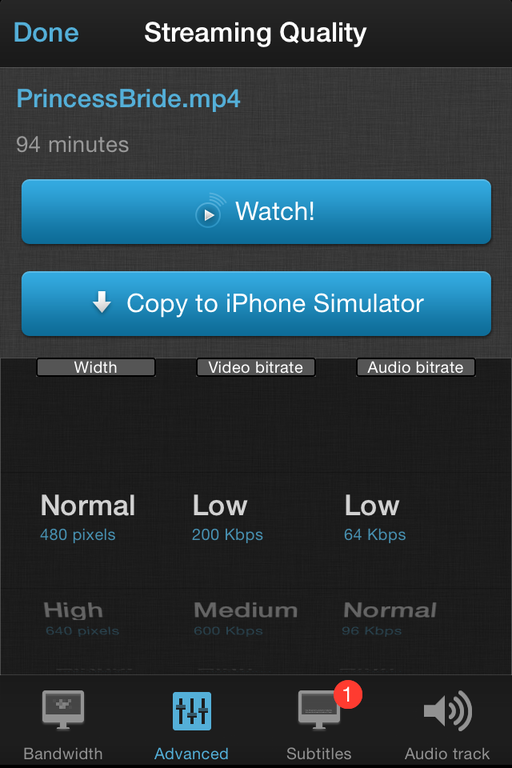
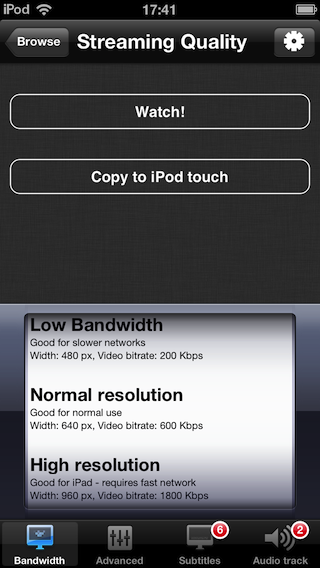
Select a streaming quality and press 'Watch'
select resolution
This will stream the movie live to your iDevice without needing to copy it to the device. It uses VLC for the transcoding, so most movie formats are supported.
You can now transfer movies directly to your device
This will allow you to watch the movies later when you are not connected to your wifi
Select your movie as in the steps above
Tap 'copy to device' instead of play
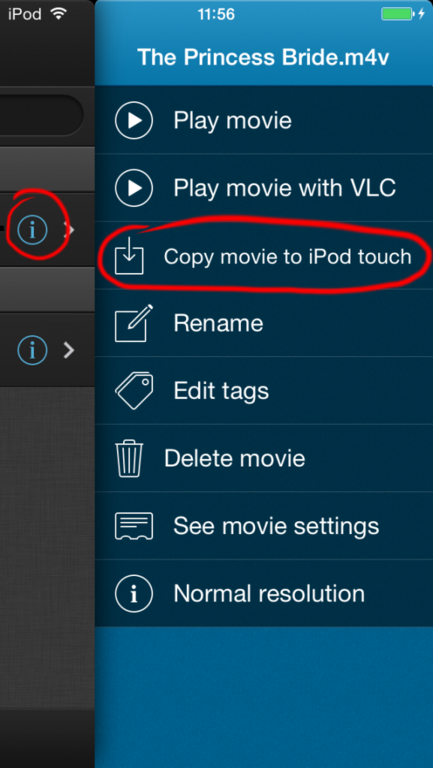
or, if you have already watched the movie, or have already set it converting, you can transfer from the movie list
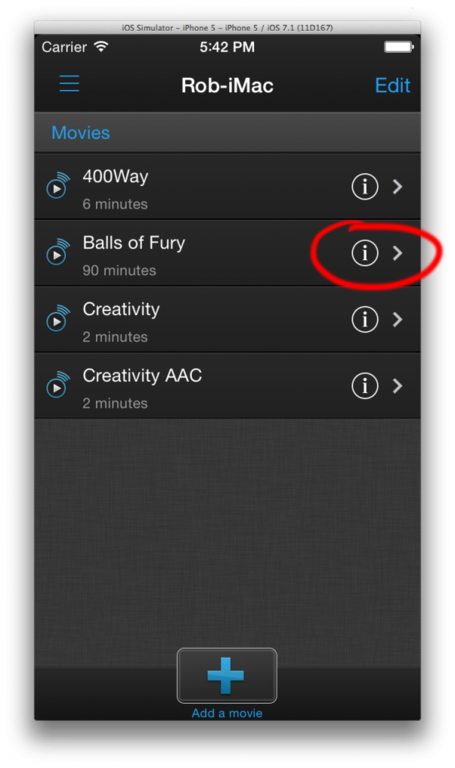
Tap on the info button next to the movie
Select 'copy to device'
copy to device
Vlc streamer will copy the movie over wifi to your device
VLC Streamer will continue to copy the movie in the background once you exit the app.
You can also transfer through iTunes
You can also transfer movies through iTunes. Unless the movie is an mp4 type, then VLC Streamer will use the vlc player code on the app to try to play it. This won't work for every movie - but it will work for most.
To transfer movies,
Plug your iDevice into your computer
Select your device in iTunes
Select the Apps tab
Scroll to the bottom of the page where you will see a 'Documents' section
Select VLC Streamer on the left of the documents window, and drag your movie to the document list on the right.
How to connect to VLC Streamer from outside your home
This article is written by a VLC Streamer user called Eric who has set up his own helper so that he can access it from anywhere.
This is not an easy process, and it has definite security implications for your network. VLC Streamer is _not_ designed with the intention of allowing access from the internet, so you should not assume that it is a secure application - even with a password enabled.
Also, this is not something that we can provide support for; If you are looking for help then the forum is the best bet.
Thanks to Eric for this writeup - I hope it is helpful!
Setting Up a Remote VLCStreamer Helper Server
While there are other options such as setting up your own Virtual Private Network (VPN), a much easier solution to serving files to iOS devices outside of your Local Area Network (LAN) is having your router forward the request from an iOS device directly to the VLCStreamer Helper Server by setting up a port forwarding rule in your router. Please read through the entire instructions before starting.
1 - Opening a port on your router
To begin, you will need a few things
The ability to log in to your router and change settings
The external facing Internet Protocol (IP) address of your router
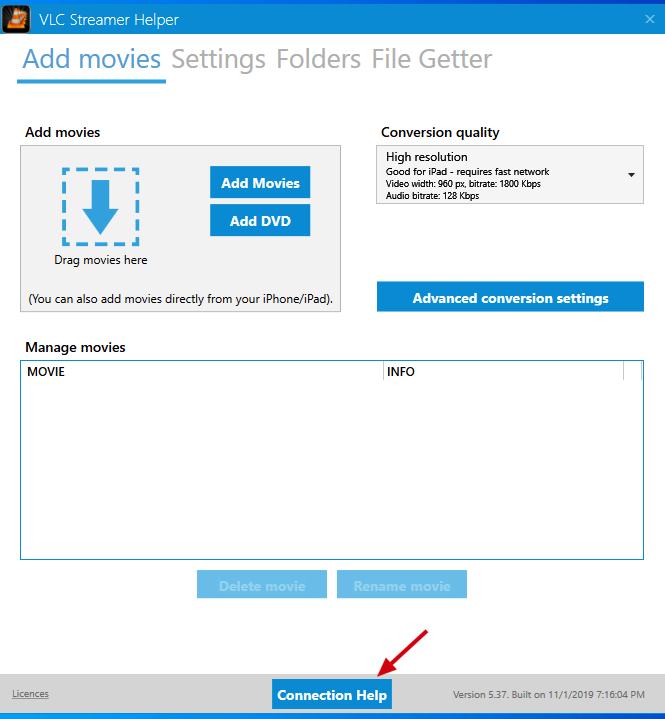
The internal IP address of the computer running the VLCStreamer Helper
This can be found by clicking on the 'Connection help' button on the VLC Streamer Helper
After you have these three things, log in to your router and add a port forwarding rule to pass traffic coming in on a port you want to use to the IP address of the computer running VLCStreamer Helper Server. The external port is your choice and it is the port that will be specified in step 4 below. The internal port is the port that is used by VLCStreamer Helper Server to receive data. The default port is 54340 internally, and in this scenario, we have used the default port for both sides to prevent any problems. The protocol used by VLCStreamer is TCP, so here is no need to enable UDP. The device IP is the IP address of computer running VLCStreamer Helper Server. Below is an example of a port forwarding setting on a Linksys router.
Linksys port forwarding example
If you are struggling with your port forwarding, the site Port Forward has excellent free guides for most routers
After completing this step, it is possible to skip to step 3, however in the case of your external IP address changing, you will not be able to access the VLCStreamer Helper Server without having access to the computer it is running on, checking the IP address, and adding a new remote server on your iOS device with the new IP address. If you take your iOS device on a vacation or a business trip, invariably this is when your IP address will change. At least that is the way my luck seems to work. Because of this, step 2 is highly recommended but optional. Caveat emptor.
2 - Dealing with Dynamic IP addresses (optional)
While most Internet Service Providers (ISPs) do offer static IP addresses that stay the same all the time, hence the name static, this usually involves an extra fee that most regular consumers do not want to pay, and often static IP addresses are only offered to business customers. More often than not, your ISP will give you a dynamic IP address that can change on a very frequent basis. If you are trying to use your IP address as a means of locating your VLCStreamer Helper Server and the IP address has changed, then you will not be able to access your media files or even access the VLCStreamer Helper Server from outside of your LAN. By using a service to monitor your external IP address, and by assigning a hostname to that external IP address, this limitation can be overcome.
The following is dependent on your router having settings for use with Dyn DNS or you installing and running an update client. Many routers have update clients for contacting Dyn DNS but if yours does not, you can find out more information on update clients here. These instructions do not cover update clients, but the previous link has information on how to use them.
Creating an Account with Dyn
Dyn offers dynamic Domain Name System (DNS) services. It isn't a free service, and there are many other companies which offer similar things, it can be used for many things beyond just setting up a remote connection to your VLCStreamer Helper Server, such as hosting a website from home, hosting a video game server, accessing a home webcam, etc. These things are well beyond the scope of these instructions however.
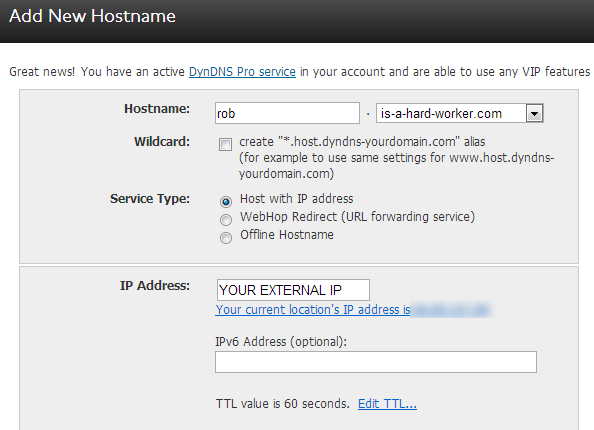
Create an account with Dyn and then add DynDNS Pro. After this has been done, you can now create a hostname that you would like to use to connect to your VLCStreamer Helper Server. Dyn offers some humorous hostnames, so take advantage of them. We are going to create a hostname rob.is-a-hard-worker.com and are using the external IP address from step 1 as the initial IP address. This address should match the address that Dyn Dns shows just below the IP address input box. Below is an example of creating a hostname at Dyn's site
Dyn setup
Changing Your Router Settings (skip this if you are using an update client)
Now that you have set up an account with Dyn and have chosen a hostname, e.g. rob.is-a-hard-worker.com, you can now take advantage of your router's ability to contact Dyn and update your IP address if it has changed. Log in to your router and locate the setting to enable IP address updating through Dyn. Add your Dyn DNS login credentials and save the settings. Below is an example of adding your credentials to a Linksys router. Your settings will almost assuredly look different.
Router Settings
3 - Changing Settings on Your VLCStreamer Helper Server
Now that your router is set to forward traffic to the computer running your VLCStreamer Helper Server, you can make some adjustments to the settings there. Open VLCStreamer Helper and under the settings tab you can make the following changes.
Use Custom Port
In this example we have kept the default port of 54340. However if you wanted to change the port for some reason, like possibly another service already using that port on your computer, then this is the place to do it. Any changes made here need to be reflected in your port forwarding rule you added, specifically you need to match the internal IP address to whatever your setting is here.
Limit Browsable Directories
If you are allowing your VLCStreamer Helper Server to be visible from outside of your LAN, it is a good idea to restrict which directories are visible. The logical directories to view are those which contain your media files only. For example allowing access to your entire C:\ drive for example is probably not the best idea.
Use Password
As mentioned above, you are making your VLCStreamer Helper Server visible to the outside world. Adding a password is a good idea. Make it a strong password. If you don't know what a strong password consists of, maybe you should test yours.
Note from Hobbyist Software : Our password implementation, and 'limit browsable directory' options are designed for casual security on your home network. They are almost certainly not strong enough to stop a competent hacker
4 - Adding the Server Settings on Your iOS device
Now that you have everything set up properly you can add your new remote server to your iOS device. Go to the settings menu and select 'Add computer manually'.
In the name field you can name the remote server whatever you want.
In the address field enter your hostname (or external IP address if you skipped step 2).
If you are using an external port other than 54340 in your port forwarding rule in step 1, you need to add it after the hostname (or IP address if you skipped step 2) and a colon. For example if you specified an external port of 32123, then in this example the address field would have rob.is-a-hard-worker.com:32123. If you are using the default port it will be added for you.
After the address is entered save and you are done.
Final note from Hobbyist Software
Hopefully this is helpful. Thanks to Eric for contributing it.
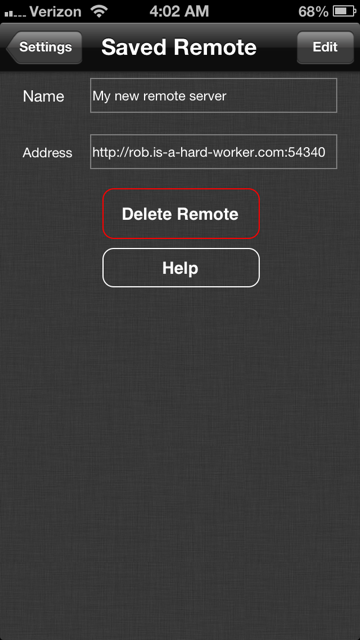
One thing to note is that due to Apple rules, if you're connected on 3g, you are not allowed to stream movies to your device. However - you can copy movies to your device, and you can then watch the movie while it copies over. When you want to access the remote server you will be prompted for the password you, hopefully, created in step 3c.
Below is an example of a newly created Remote VLCStreamer Helper Server on an iOS device.
If you are streaming a dvd, or an mkv file, then it may well have subtitles embedded in the file.
Otherwise, if your subtitles are in a separate file (like an srt file) then you need to name it correctly so that VLC can find it.
All you need to do is save the subtitle file 'next' to the movie and VLC will use it automatically when converting.
e.g.
/folder/movie.avi
/folder/movie.srt
the srt file is in the same location as the movie, and has the same name (apart from the filetype).
you will need to delete and re-add the movie after putting the subtitles in the right place.
Picking your tracks
If there is only one subtitle or audio track, then it is easy, and by default, VLC Streamer will use it.
If there are multiple options, then you need to tell VLC Streamer which one you would like to use. You can set a standard preference in your helper app, or you can pick manually when you add the movie from the iPhone/iPad.
Set your preference in the helper
If you click on the 'advanced conversion settings' button in the 'add movies' tab, then you can pick your preference
subtitle settings
You can see here that I have selected French as my preferred language for both the audio track and the subtitle track. This generally works well and is particularly successful with DVDs, however sometimes the tracks will not be labelled in a way that VLC can recognise, or there might be multiple tracks for a given language (e.g. a director's commentary audio track).
Pick your track from the iDevice
(note - at the moment, this method is not available on Android)
To pick the specific track, you need to add the movie from the iDevice, rather than adding it directly to the helper. To do this, click on 'add movie' in the main screen on your iDevice.
Once you have picked a movie, you'll get to the screen where you pick the quality setting. While you are looking at this, VLC is desperately trying to figure out what tracks are available for you to see. This might take 10s of seconds, or even a minute if your computer is very slow.
If VLC does detect tracks, then you'll see numbers show on the tabs at the bottom of the screen like in this image:
iphone settings
If so, then click on the tab and pick the track you want.
(Generally - this approach does not work for DVDs. I think the issue is that VLC looks for audio tracks in the menu screen, rather than in the 'main movie'.)
Subtitles with non-english characters
If you try converting the movie, and your subtitles look garbled, then there are two things you can check.
In the example below, the subtitle is encoded in Greek.
encoding
Changing the 'subtitle encoding' section in this case will make the subtitles work perfectly. In the case of this movie, I select 'Greek (Windows-1253)' - you may have to experiment to find the right encoding.
For subtitles in Chinese, Korean or other languages where there are lots of characters not included in the standard font, then you will normally see just squares for the characters. If you see this, then you can use the 'Custom subtitle font' option to pick a font which properly supports your language.
What about movies copied to the device?
If you copied the movie by converting it in the helper and selecting 'copy to device', then all the comments above apply.
If you copied through iTunes, then VLC will try to play the movie on the device. It will still use subtitles, though you have somewhat less control. - Specifically, you can't control the encoding used for subtitles.
If you copied an mp4 or a mov through iTunes, then by default, VLC Streamer will try to play this in the system player. This doesn't handle subtitles. However - you can force VLC Streamer to play through VLC by tapping on the info button and selecting 'Play in VLC'
Anything else?
Hopefully this will help. If you have any comments or questions, then please post on the forum
There are a few common issues that people have reported with VLC Streamer
First Checks
Most problems that people have relate to a few common issues, so please check these first before more detailed troubleshooting
Check that you have installed the setup helper on your PC or Mac
Check that your phone and your computer are both connected to the same local network
(sometimes the phones connect to other networks that are within reach. You can check this in wifi settings page)
VLC Streamer won’t connect to my PC / Mac
Run the connection tests on the helper app
connection help
VLC Can’t process the movie
VLC is great, but it can’t handle everything. Unfortunately, sometimes even if it can play a movie, then it can’t convert it to the format needed for streaming.If you are a VLC expert, then VLC Streamer is set up to help you investigate the problem as easily as possible. Click here for details on how to do that.
I don’t see a movie list. When I try to add a movie, I see an empty page, then I see ‘conncection lost’
This is almost certainly a firewall issue. Bonjour is able to pass through your firewall which is why the iPhone app can see your computer, but it is not able to connect to the helper.
The solution is to make sure that all your firewalls allow VLC Streamer through them.
Things to check
The firewall on your computer
The firewall on your router (sometimes these are named confusingly. Google for ‘disable firewall on <your type of router>’ for help
Some routers don’t let wireless devices talk to devices connected by wires (ethernet). If you can find a setting like this in the router, then disable it.
I can browse for movies, but my iPhone/iPad/iPod keeps losing the wifi connection. I might have to keep entering my password
Wifi reception is tricky. You can have your signal blocked by other wifi signals, walls, microwaves or any number of other things. PC Pro has an excellent article all about what might be killing your signal.