The main purpose of VLC Streamer is to let you stream movies live without having to go through iTunes.
To do this,
Launch VLC Streamer
Tap on the computer you want to connect to
'Add a Movie' and select the file you want
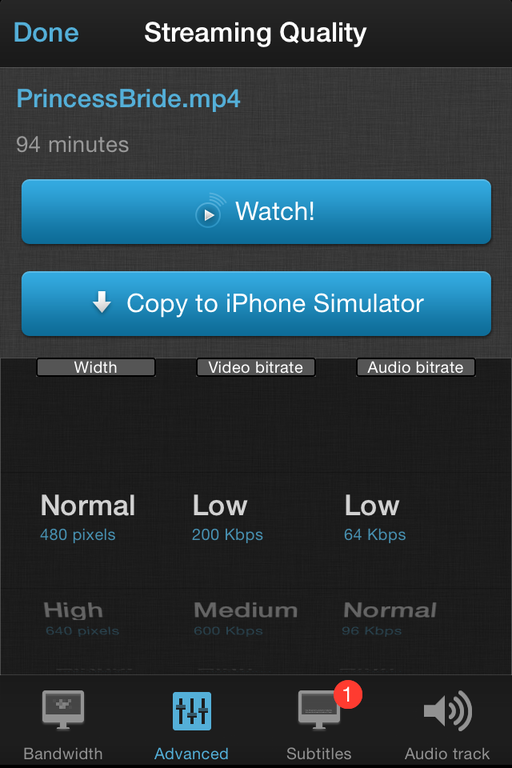
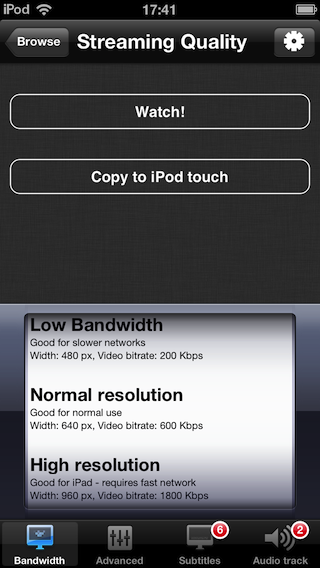
Select a streaming quality and press 'Watch'
select resolution
This will stream the movie live to your iDevice without needing to copy it to the device. It uses VLC for the transcoding, so most movie formats are supported.
You can now transfer movies directly to your device
This will allow you to watch the movies later when you are not connected to your wifi
Select your movie as in the steps above
Tap 'copy to device' instead of play
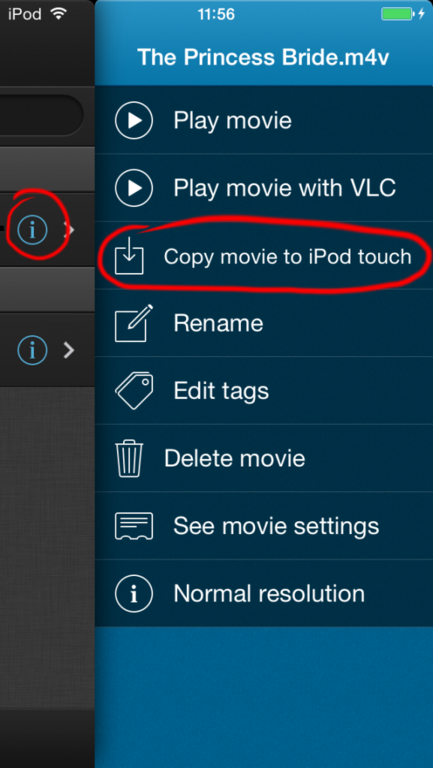
or, if you have already watched the movie, or have already set it converting, you can transfer from the movie list
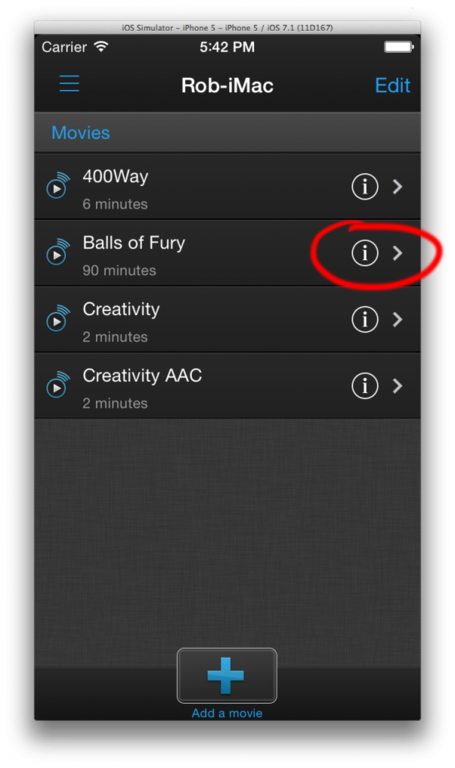
Tap on the info button next to the movie
Select 'copy to device'
copy to device
Vlc streamer will copy the movie over wifi to your device
VLC Streamer will continue to copy the movie in the background once you exit the app.
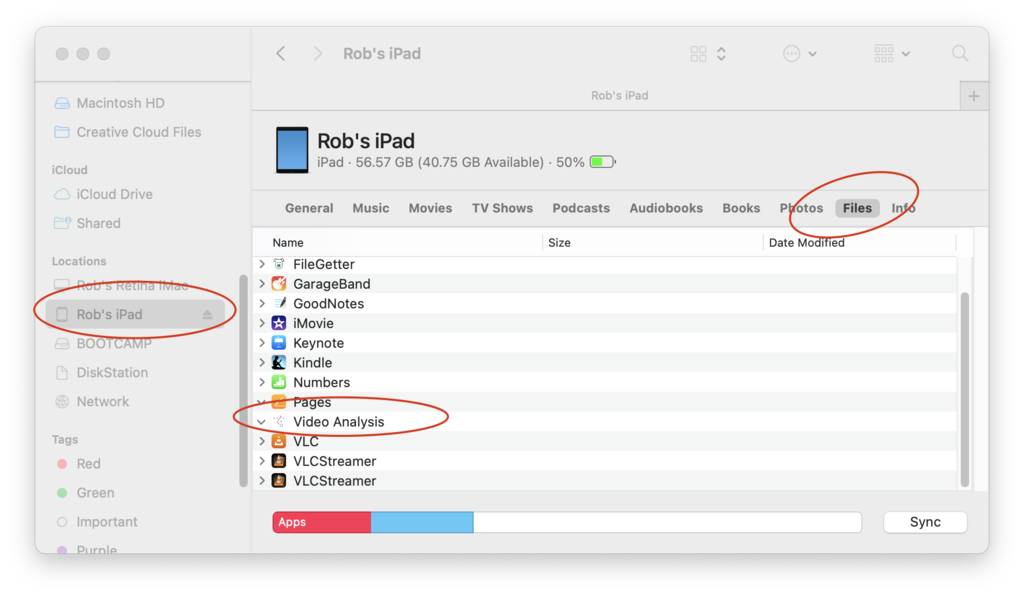
You can also transfer through iTunes
You can also transfer movies through iTunes. Unless the movie is an mp4 type, then VLC Streamer will use the vlc player code on the app to try to play it. This won't work for every movie - but it will work for most.
To transfer movies,
Plug your iDevice into your computer
Select your device in iTunes
Select the Apps tab
Scroll to the bottom of the page where you will see a 'Documents' section
Select VLC Streamer on the left of the documents window, and drag your movie to the document list on the right.
How to connect to VLC Streamer from outside your home
This article is written by a VLC Streamer user called Eric who has set up his own helper so that he can access it from anywhere.
This is not an easy process, and it has definite security implications for your network. VLC Streamer is _not_ designed with the intention of allowing access from the internet, so you should not assume that it is a secure application - even with a password enabled.
Also, this is not something that we can provide support for; If you are looking for help then the forum is the best bet.
Thanks to Eric for this writeup - I hope it is helpful!
Setting Up a Remote VLCStreamer Helper Server
While there are other options such as setting up your own Virtual Private Network (VPN), a much easier solution to serving files to iOS devices outside of your Local Area Network (LAN) is having your router forward the request from an iOS device directly to the VLCStreamer Helper Server by setting up a port forwarding rule in your router. Please read through the entire instructions before starting.
1 - Opening a port on your router
To begin, you will need a few things
The ability to log in to your router and change settings
The external facing Internet Protocol (IP) address of your router
The internal IP address of the computer running the VLCStreamer Helper
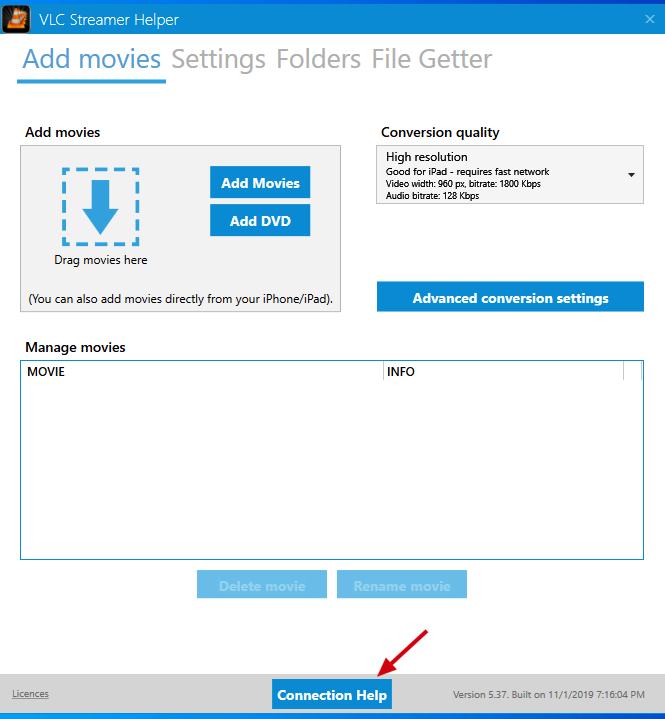
This can be found by clicking on the 'Connection help' button on the VLC Streamer Helper
After you have these three things, log in to your router and add a port forwarding rule to pass traffic coming in on a port you want to use to the IP address of the computer running VLCStreamer Helper Server. The external port is your choice and it is the port that will be specified in step 4 below. The internal port is the port that is used by VLCStreamer Helper Server to receive data. The default port is 54340 internally, and in this scenario, we have used the default port for both sides to prevent any problems. The protocol used by VLCStreamer is TCP, so here is no need to enable UDP. The device IP is the IP address of computer running VLCStreamer Helper Server. Below is an example of a port forwarding setting on a Linksys router.
Linksys port forwarding example
If you are struggling with your port forwarding, the site Port Forward has excellent free guides for most routers
After completing this step, it is possible to skip to step 3, however in the case of your external IP address changing, you will not be able to access the VLCStreamer Helper Server without having access to the computer it is running on, checking the IP address, and adding a new remote server on your iOS device with the new IP address. If you take your iOS device on a vacation or a business trip, invariably this is when your IP address will change. At least that is the way my luck seems to work. Because of this, step 2 is highly recommended but optional. Caveat emptor.
2 - Dealing with Dynamic IP addresses (optional)
While most Internet Service Providers (ISPs) do offer static IP addresses that stay the same all the time, hence the name static, this usually involves an extra fee that most regular consumers do not want to pay, and often static IP addresses are only offered to business customers. More often than not, your ISP will give you a dynamic IP address that can change on a very frequent basis. If you are trying to use your IP address as a means of locating your VLCStreamer Helper Server and the IP address has changed, then you will not be able to access your media files or even access the VLCStreamer Helper Server from outside of your LAN. By using a service to monitor your external IP address, and by assigning a hostname to that external IP address, this limitation can be overcome.
The following is dependent on your router having settings for use with Dyn DNS or you installing and running an update client. Many routers have update clients for contacting Dyn DNS but if yours does not, you can find out more information on update clients here. These instructions do not cover update clients, but the previous link has information on how to use them.
Creating an Account with Dyn
Dyn offers dynamic Domain Name System (DNS) services. It isn't a free service, and there are many other companies which offer similar things, it can be used for many things beyond just setting up a remote connection to your VLCStreamer Helper Server, such as hosting a website from home, hosting a video game server, accessing a home webcam, etc. These things are well beyond the scope of these instructions however.
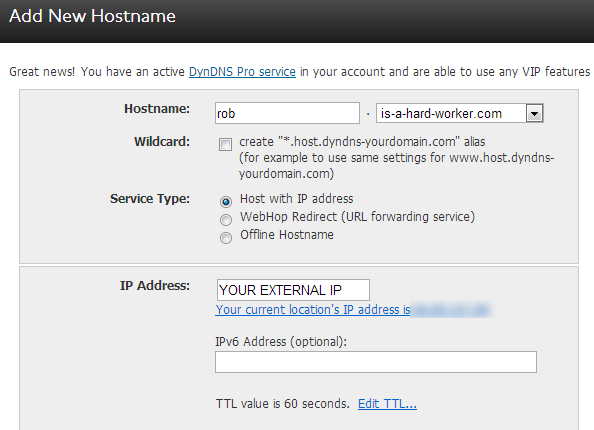
Create an account with Dyn and then add DynDNS Pro. After this has been done, you can now create a hostname that you would like to use to connect to your VLCStreamer Helper Server. Dyn offers some humorous hostnames, so take advantage of them. We are going to create a hostname rob.is-a-hard-worker.com and are using the external IP address from step 1 as the initial IP address. This address should match the address that Dyn Dns shows just below the IP address input box. Below is an example of creating a hostname at Dyn's site
Dyn setup
Changing Your Router Settings (skip this if you are using an update client)
Now that you have set up an account with Dyn and have chosen a hostname, e.g. rob.is-a-hard-worker.com, you can now take advantage of your router's ability to contact Dyn and update your IP address if it has changed. Log in to your router and locate the setting to enable IP address updating through Dyn. Add your Dyn DNS login credentials and save the settings. Below is an example of adding your credentials to a Linksys router. Your settings will almost assuredly look different.
Router Settings
3 - Changing Settings on Your VLCStreamer Helper Server
Now that your router is set to forward traffic to the computer running your VLCStreamer Helper Server, you can make some adjustments to the settings there. Open VLCStreamer Helper and under the settings tab you can make the following changes.
Use Custom Port
In this example we have kept the default port of 54340. However if you wanted to change the port for some reason, like possibly another service already using that port on your computer, then this is the place to do it. Any changes made here need to be reflected in your port forwarding rule you added, specifically you need to match the internal IP address to whatever your setting is here.
Limit Browsable Directories
If you are allowing your VLCStreamer Helper Server to be visible from outside of your LAN, it is a good idea to restrict which directories are visible. The logical directories to view are those which contain your media files only. For example allowing access to your entire C:\ drive for example is probably not the best idea.
Use Password
As mentioned above, you are making your VLCStreamer Helper Server visible to the outside world. Adding a password is a good idea. Make it a strong password. If you don't know what a strong password consists of, maybe you should test yours.
Note from Hobbyist Software : Our password implementation, and 'limit browsable directory' options are designed for casual security on your home network. They are almost certainly not strong enough to stop a competent hacker
4 - Adding the Server Settings on Your iOS device
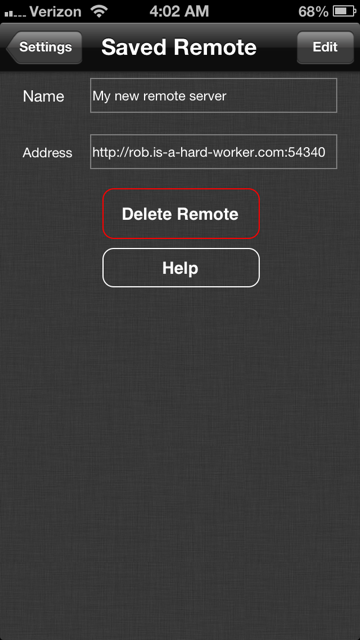
Now that you have everything set up properly you can add your new remote server to your iOS device. Go to the settings menu and select 'Add computer manually'.
In the name field you can name the remote server whatever you want.
In the address field enter your hostname (or external IP address if you skipped step 2).
If you are using an external port other than 54340 in your port forwarding rule in step 1, you need to add it after the hostname (or IP address if you skipped step 2) and a colon. For example if you specified an external port of 32123, then in this example the address field would have rob.is-a-hard-worker.com:32123. If you are using the default port it will be added for you.
After the address is entered save and you are done.
Final note from Hobbyist Software
Hopefully this is helpful. Thanks to Eric for contributing it.
One thing to note is that due to Apple rules, if you're connected on 3g, you are not allowed to stream movies to your device. However - you can copy movies to your device, and you can then watch the movie while it copies over. When you want to access the remote server you will be prompted for the password you, hopefully, created in step 3c.
Below is an example of a newly created Remote VLCStreamer Helper Server on an iOS device.
If you are streaming a dvd, or an mkv file, then it may well have subtitles embedded in the file.
Otherwise, if your subtitles are in a separate file (like an srt file) then you need to name it correctly so that VLC can find it.
All you need to do is save the subtitle file 'next' to the movie and VLC will use it automatically when converting.
e.g.
/folder/movie.avi
/folder/movie.srt
the srt file is in the same location as the movie, and has the same name (apart from the filetype).
you will need to delete and re-add the movie after putting the subtitles in the right place.
Picking your tracks
If there is only one subtitle or audio track, then it is easy, and by default, VLC Streamer will use it.
If there are multiple options, then you need to tell VLC Streamer which one you would like to use. You can set a standard preference in your helper app, or you can pick manually when you add the movie from the iPhone/iPad.
Set your preference in the helper
If you click on the 'advanced conversion settings' button in the 'add movies' tab, then you can pick your preference
subtitle settings
You can see here that I have selected French as my preferred language for both the audio track and the subtitle track. This generally works well and is particularly successful with DVDs, however sometimes the tracks will not be labelled in a way that VLC can recognise, or there might be multiple tracks for a given language (e.g. a director's commentary audio track).
Pick your track from the iDevice
(note - at the moment, this method is not available on Android)
To pick the specific track, you need to add the movie from the iDevice, rather than adding it directly to the helper. To do this, click on 'add movie' in the main screen on your iDevice.
Once you have picked a movie, you'll get to the screen where you pick the quality setting. While you are looking at this, VLC is desperately trying to figure out what tracks are available for you to see. This might take 10s of seconds, or even a minute if your computer is very slow.
If VLC does detect tracks, then you'll see numbers show on the tabs at the bottom of the screen like in this image:
iphone settings
If so, then click on the tab and pick the track you want.
(Generally - this approach does not work for DVDs. I think the issue is that VLC looks for audio tracks in the menu screen, rather than in the 'main movie'.)
Subtitles with non-english characters
If you try converting the movie, and your subtitles look garbled, then there are two things you can check.
In the example below, the subtitle is encoded in Greek.
encoding
Changing the 'subtitle encoding' section in this case will make the subtitles work perfectly. In the case of this movie, I select 'Greek (Windows-1253)' - you may have to experiment to find the right encoding.
For subtitles in Chinese, Korean or other languages where there are lots of characters not included in the standard font, then you will normally see just squares for the characters. If you see this, then you can use the 'Custom subtitle font' option to pick a font which properly supports your language.
What about movies copied to the device?
If you copied the movie by converting it in the helper and selecting 'copy to device', then all the comments above apply.
If you copied through iTunes, then VLC will try to play the movie on the device. It will still use subtitles, though you have somewhat less control. - Specifically, you can't control the encoding used for subtitles.
If you copied an mp4 or a mov through iTunes, then by default, VLC Streamer will try to play this in the system player. This doesn't handle subtitles. However - you can force VLC Streamer to play through VLC by tapping on the info button and selecting 'Play in VLC'
Anything else?
Hopefully this will help. If you have any comments or questions, then please post on the forum
There are a few common issues that people have reported with VLC Streamer
First Checks
Most problems that people have relate to a few common issues, so please check these first before more detailed troubleshooting
Check that you have installed the setup helper on your PC or Mac
Check that your phone and your computer are both connected to the same local network
(sometimes the phones connect to other networks that are within reach. You can check this in wifi settings page)
VLC Streamer won’t connect to my PC / Mac
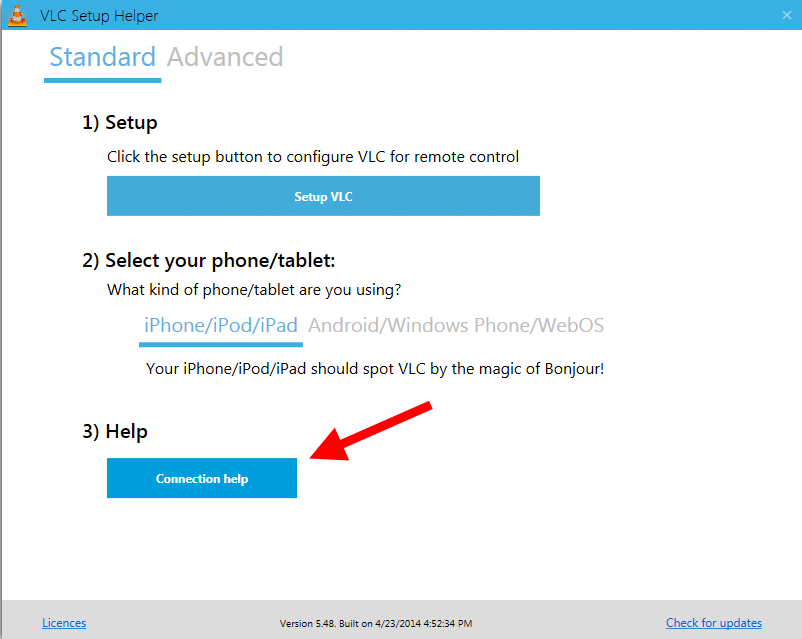
Run the connection tests on the helper app
connection help
VLC Can’t process the movie
VLC is great, but it can’t handle everything. Unfortunately, sometimes even if it can play a movie, then it can’t convert it to the format needed for streaming.If you are a VLC expert, then VLC Streamer is set up to help you investigate the problem as easily as possible. Click here for details on how to do that.
I don’t see a movie list. When I try to add a movie, I see an empty page, then I see ‘conncection lost’
This is almost certainly a firewall issue. Bonjour is able to pass through your firewall which is why the iPhone app can see your computer, but it is not able to connect to the helper.
The solution is to make sure that all your firewalls allow VLC Streamer through them.
Things to check
The firewall on your computer
The firewall on your router (sometimes these are named confusingly. Google for ‘disable firewall on <your type of router>’ for help
Some routers don’t let wireless devices talk to devices connected by wires (ethernet). If you can find a setting like this in the router, then disable it.
I can browse for movies, but my iPhone/iPad/iPod keeps losing the wifi connection. I might have to keep entering my password
Wifi reception is tricky. You can have your signal blocked by other wifi signals, walls, microwaves or any number of other things. PC Pro has an excellent article all about what might be killing your signal.
I have to run the setup helper every time I want to connect
On the iPhone, VLC Remote looks for computers on your network using Bonjour. If there is no bonjour service advertised on your computer, then the remote won't be able to find your computer.
The setup helper makes sure that there is a service advertised when it runs.
If you can't find your computer when the setup helper isn't running, there are two possible fixes
Turn on a service like file or printer sharing which will advertise on bonjour
Save the remote. To do this, click 'Add Computer', then 'Select from Found Computers'. (For this time, make sure the setup helper _is_ running).
Now your computer is saved, and VLC Remote will try to connect to it even if there is no bonjour service.
My saved remote won't connect when I restart my computer
VLC Remote saves the IP address of your computer. This is the address that it uses to contact your computer and connect to VLC.
Most home routers will give out the same IP address every time they see a specific computer which allows this to work.
If the IP address of your computer keeps changing (you can check the IP address from the setup helper), then you have two options
Change the settings on your router so that it gives out the same IP address each time
Turn on a bonjour service so that VLC Remote can find your computer anyway when it scans the network.
just tap on the 'play icon' next to the folder and all its contents will be added to the playlist.
Stop VLC asking to fix files
this isn't actually a VLC Remote feature, but it is annoying when you are trying to play things remotely. You can control the behaviour in VLC at
Preferences (switch to All preferences in the bottom left)
 Input / Codecs
  Demuxers
   AVI
    Force Index Creation
Start VLC automatically on Windows
The easy way is just to drag VLC, (or a shortcut to VLC) to your autostart folder. This will start VLC in its normal configuration with a window visible.
You have configured VLC and are running your testing. (possibly with the setup helper) Even the first step where you check that things are working on your Laptop/PC isn't working
Here are the next steps...
We assume the following:
You have the latest version of VLC installed and it is currently running
You have tried to go to http://localhost:8080 on your Mac or PC and you don't see a remote control interface
there are three possible problems:
You haven't enabled the http interface
It is worth double checking in the preferences page for VLC to check that it matches the picture in the setup page ( WinMac ). Make sure that the http interface is selected in the 'main interfaces' tab.
You have changed the port that VLC is running on
In the preferences, click on the http interface (below main interfaces) and check that it is set to port 8080.
Something else is running a web interface on port 8080
Some applications like bit torrent clients might offer their own web interface on port 8080. Try closing other apps, then closing VLC and restarting it. Check http://localhost:8080 again
If this is the problem, then you can set VLC to run on another port.
Close VLC
Open the vlcrc preferences fileThe location of the file is described in the 'Where does VLC store its config file?' section here:http://www.videolan.org/support/faq.html
Find the setting for http-port
Adjust it for the port you want (in the example below, I set it to port 9090 )
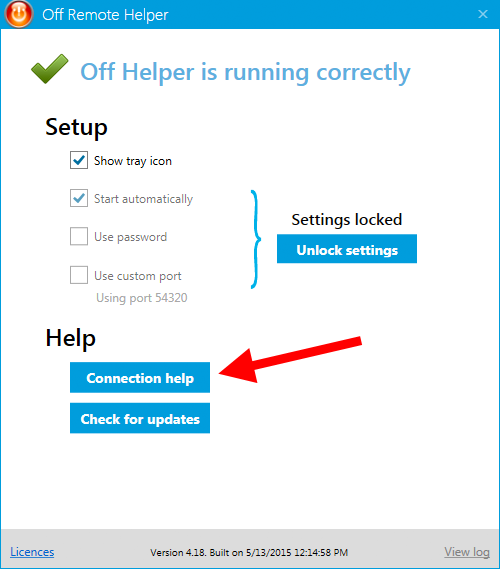
The Off Remote Helper app on your Mac/PC has a 'connection help' button.
Click on that for a set of tests that will let you pin down where there is a problem with your connection.
As well as giving you exact tests, the connection help will help you figure out any issues.
connection help
All About the Firewall
99% of the time, Bonjour deals with any firewall issues for you. If you are in that 1% then you may have to check your firewall settings to make sure that Bonjour and the Off-Helper are getting access.
Mac
First Check : If you are having any trouble connecting, then try turning off the firewall to test (System Preferences / Security / Firewall). If you can get the connection with your firewall off, then you can turn it on and tweak the settings to allow the required permissions.
When you install Off_Helper on your Mac, you'll be asked if you want to allow it to accept connections (say yes!)
Windows
First Check : If you are having any trouble connecting, then try turning off the firewall to test (Start / Control Panel / Windows Firewall). If you can get the connection with your firewall off, then you can turn it on and tweak the settings to allow the required permissions.
If you use the default windows firewall on Windows, then by default it will allow the connections required.
If you use another firewall (or have changed your default settings) then you need to make sure that two applications are allowed through your firewall.
Bonjour
the actual file is c:\Program Files\Bonjour\mDNSResponder.exe
or if that isn't installed C:\Program Files\Hobbyist Software\Off-Helper\mdnsresponder.exe
Off-Helper
the actual file is C:\Program Files\Hobbyist Software\Off-Helper\Off-Helper Service.exe
depending on the firewall, you may need to reboot after making the changes
Still not working
You may have another seperate firewall on your router. Again, the easiest way to test whether this is blocking the connection is to go into your router settings and turn off the firewall completely. If that works, then you can turn of your firewall again and fiddle with the settings.
NB: You can disconnect your router from the internet when playing with your firewall settings if you want to make sure that your computers are completely safe.
Multi Monitor wallpaper provides multiple ways for you to adjust your screen layout. From easy dragging to very precise keyboard controls. You can customise the layout, as well as details about your screens.
Layout
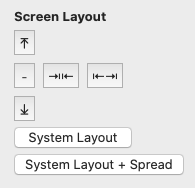
1) Easy Layout Buttons
Use the layout buttons to get started.
The System Layout simply copies your default system layout
System Layout + Spread uses the system layout, but expands things a little so that there is a gap between your screens.
You can use the alignment buttons (up, down and -) to align the tops, bottoms or centres of your screens.
auto layout
2) Just drag the screens
You can click on the grid background for each screen and simply drag it around. This is the easiest and quickest approach if you need to adjust things manually. You can use the horizontal and diagonal lines to line your screens up pretty accurately.
You can click on the grid selector at the bottom of the window to change your grid type
grid
2) Drag in the window
Drag the screens in the main window as an alternative method to adjust their position
You can hold down the shift key to lock the movement in the horizontal/vertical directions
layout
3) Fine Control - Keyboard
You can use the keyboard for pixel-by-pixel adjustments.
Click on a screen in the main window, then use the arrow keys to move it.
You can hold down the keys but be patient, you're literally moving a pixel at a time!
Screen Configuration
Normally, the system gets the size of your screens about right and Multi Monitor Wallpaper will use those sizes.
Sometimes though - the details are a bit off, and you might want to adjust them manually.
Simply click on the dropdown to pick the screen you want to adjust (you can see the numbers in the main window). Click 'Adjust' and you can manually enter the width in mm of your screen.
Get Creative
You can get creative with your layouts!
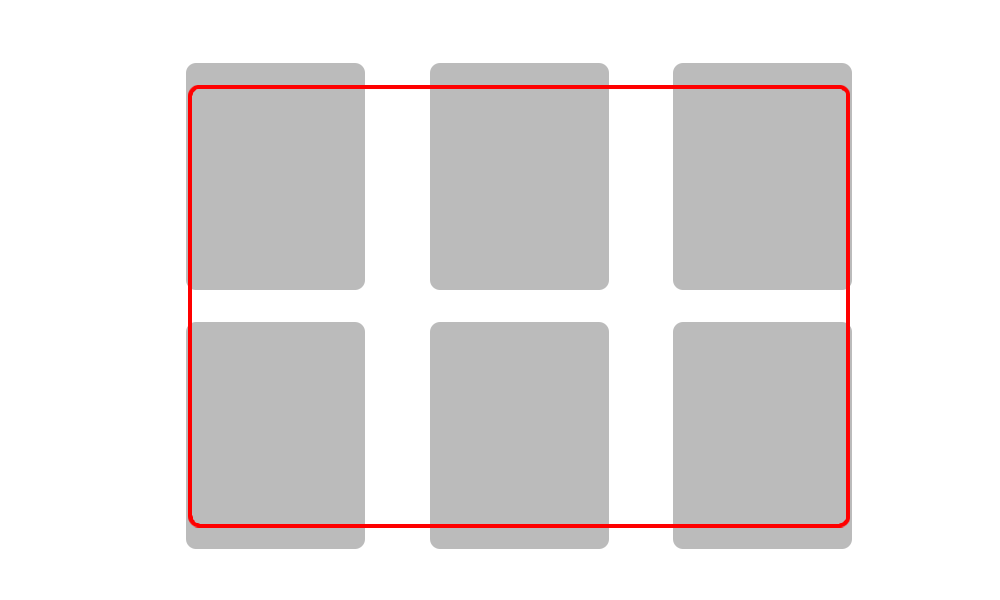
For example, one user has a row of six screens in a grid, and a separate screen on the other side of the room.
Your layouts don't have to match the real world. I advised him to set up his 6 'grid' monitors in a normal grid pattern. Then to adjust the size of the 'extra' monitor so that the system thought it was really large and put it 'on top' of the other monitors
Grid in Grey, 'Extra' in red
This way, the grid monitors get a wallpaper spread across them in the normal way, but the 'extra' monitor gets almost the whole image as the background.
Note: This fix applies to Multi Monitor Wallpaper, or Perfect Wallpaper. The steps are the same for either app.
This fix typically works if:
Multi Monitor Wallpaper Wallpaper or Perfect Wallpaper won't set the wallpaper for a screen
Wallpaper is lost/broken when you attach or remove monitors
What to do
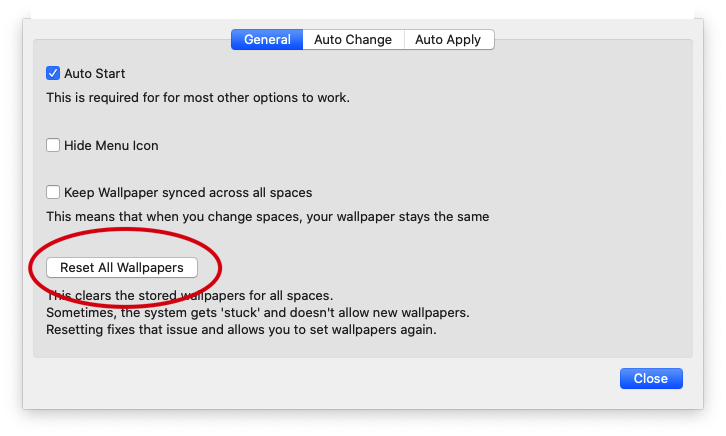
Open Multi Monitor Wallpaper or Perfect Wallpaper
Open settings (click on the cog icon, or menu/preferences)
Click on 'Reset All Wallpapers'
Allow the app access to the required folder
reset all wallpapers
This will reset all your spaces/desktops (though you won't immediately see the change in your currently visible workspace)
Once you have done this, you can set your wallpapers again
Background for the Technically Minded
Setting the wallpaper is actually a very simple command in Mac OS. Essentially - I say 'set this image for screen N'
Once that is done - Multi Monitor Wallpaper or Perfect Wallpaper has no part in 'keeping the wallpaper active' - the operating system is completely in charge.
This means that when the wallpaper is 'lost' - the operating system failed to properly save and restore the configuration.
In some cases, the system gets 'stuck' and stops allowing apps to set new wallpapers.
I have pinned down at least one way to reliably re-create this bug on my mac. What seems to happen is that the database where the system stores what image is applied for each screen/space gets corrupted.
The database is stored at ~/Library/Application Support/Dock/desktoppicture.db
I have reported this to Apple (and submitted a demonstration project and corrupted database
This fix makes sure that MMW or Perfect Wallpaper has access to the folder where your images are stored. It does this by temporarily allowing the app to access any folder on your computer.
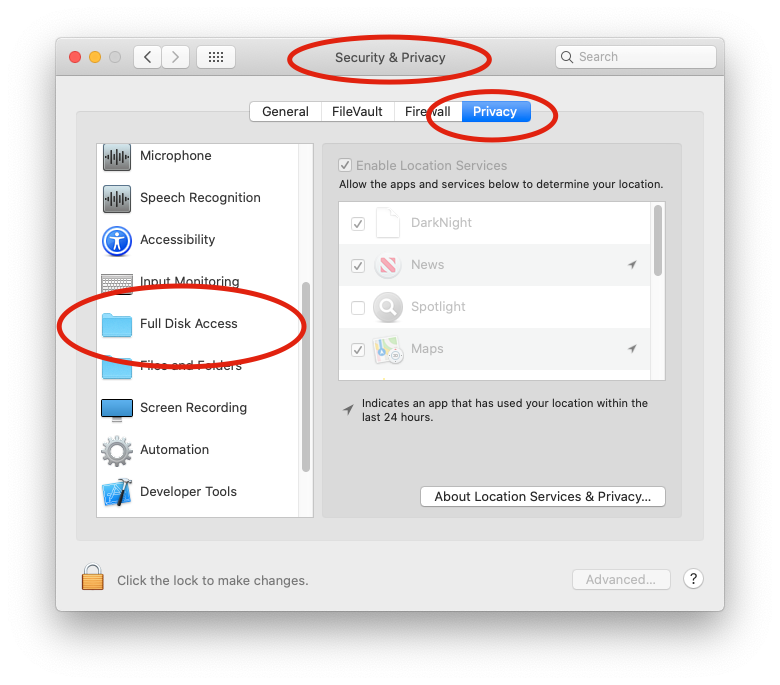
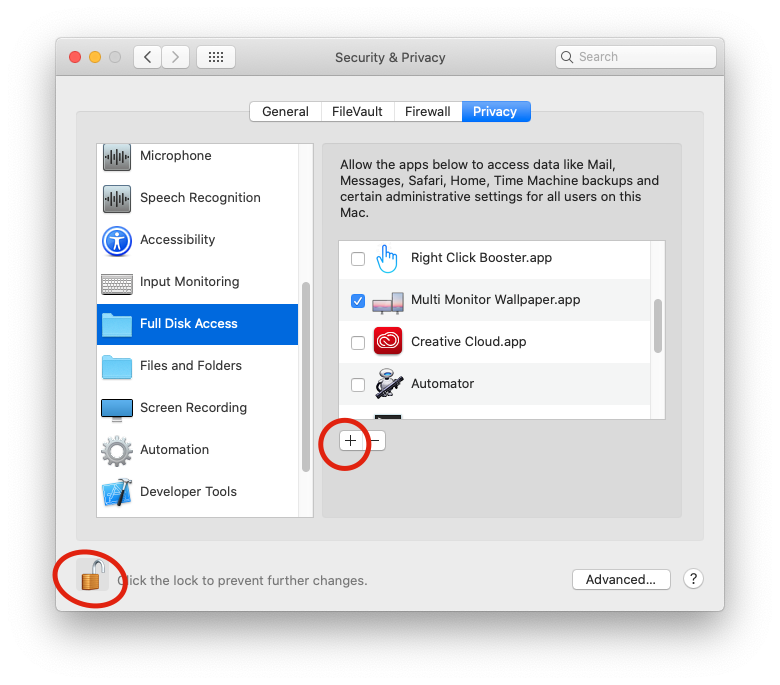
Open the System Preferences App
Click on 'Security and Privacy'
Click on the 'Privacy' tab
In the left hand pane, scroll down to find 'Full Disk Access'
full disk access
Click on the lock at the bottom left and authenticate
Click on the '+' icon to add an app
Add Multi Monitor Wallpaper or Perfect Wallpaper
Select the 'Quit Now' option when the system tells you that the app will not have full access until it is quit
add the app
Relaunch the app and check that it works
Remove Full Disk Access from the app
(step 9 is optional, but it is a good idea as the app doesn't need this access generally)
Right Click Booster sends a single path to the script
If you select multiple files, then RCB will send the path to the shared directory (if they are all in the same directory). If you select a single file, then RCB will send the path of that file unless you select the 'requiresDirectory' option in your action description.
Applescript format
Applescript scripts should be saved as .applescript
Actions are defined by comments at the top of the applescript file.
Use multiple lines for multiple actions.
The path is sent as an argument to the handler (function).
Shell Script format
Shell scripts should be saved as .sh
Actions are defined by comments at the top of the applescript file.
Example scripts are given in the RCB_Scripts disk image within the app bundle, available through the preferences.
You can discuss scripts and ask questions in the forum
Default ports and Bonjour identifiers
When you install our apps, we configure the windows firewall to allow communication on the relevant port.
However if you have a different firewall, you'll need to make sure that it allows the app through.
Off Helper
port 54320
hs-off
Hobbyist Identifier
hs-ident
(no port)
Watchover
port 54330
hs-watchover
VLC Streamer
port 54340
hs-vlcstream
File Getter
port 54350
hs-filegetter
All our apps use Bonjour to let the device discover your computer.
Apple says:The Bonjour networking protocol sends and receives network packets on UDP port 5353.
The Bonjour installer will configure the Windows firewall appropriately during installation on supported systems, but if you have a separate "personal firewall" enabled, you will need to ensure that UDP port 5353 is open for Bonjour to work correctly.
Security Software
NB: all recommendations here apply to Windows
One of the most frequent problems that people have with our software relates to their security software being overzealous and blocking either network connections, or the ability for our apps to save data in their settings.
There are a bunch of security apps out there with dizzying arrays of functionality. The thing they all seem to have in common is a complex set of settings and options. If you are a super-techie user, then you may want to monitor and tweak settings for each app you run. Of course, if you are a super-techie user, then you probably won't have problems configuring your security software to make sure that it doesn't interfere with our apps.
For everyone else, (including people who want their security apps to 'just work') I recommend the apps listed below.
This why I recommend them:
They're free
They're well respected
They won't get in the way of applications running normally
They won't slow your computer down unreasonably
We test all our apps to make sure they work with these options (as will most other developers)
These are the apps I install on my computers and all my family's computers.
Firewall
Use Microsoft's built in firewall.
Get rid of whatever other firewall you are using. The chances are that it is complex and doesn't give you anything useful that Microsoft doesn't give you for free.
Once you turn off your old firewall (I'd suggest fully uninstalling it), Windows will ask you if you want to turn on the default firewall. Do that and you're set.
It's free, it does a good job, and it won't slow your computer down. Better still, it won't try to get you to pay every few months by releasing a new version and trying to hide the free download link!
Auto Updates
Make sure you turn on Windows' 'Automatic Updates' (you can find it in the control centre).
This will make sure you stay up to date with the latest security fixes.
Caveat
I'm not a security expert, these are just my recommendations based on my experience and the feedback from various tech groups that I use. No security software will stop you from infesting your computer with spyware and viruses if you try hard enough! The main protection is just to be sensible about what applications you download and run.
How do I uninstall...
Windows
Launch Control Panel / Add & Remove Programs
Select the application you want to install, then follow the instructions
Mac OS
Off
Quit Off Helper
If the menu item is showing at the top of your screen, then click on this and select 'Quit off-Helper'
If the menu item is disabled, then
Launch the main Off Helper app from your Applications folder
Enable 'Show Menu-Bar Icon'
(then right click on the menu icon and select 'Quit off-Helper'
Right Click on Off Helper in your Applications folder and select 'move to trash'.
VLC Streamer
Quit VLC Streamer
If the menu item is showing at the top of your screen, then click on this and select 'Quit VLC Streamer'
If the menu item is disabled, then :
Launch the main VLC Streamer app from your Applications folder
Click on the 'Settings' tab,
Enable 'Show Menu-Bar Icon'
(then right click on the menu icon and select 'Quit VLC Streamer'
Right Click on VLC Streamer in your Applications folder and select 'move to trash'.
Right Click Booster
Disable the plugin
Open Right Click Booster, and select the 'Preferences' tab
Click on 'Extensions preference'
The system 'extensions preference pane' should open. Uncheck the 'Finder' option beneath Right Click Booster.
Quit Right Click Booster
Right click on 'Right Click Booster' in your dock, and select 'Quit'
Right Click on 'Right Click Booster' in your Applications folder and select 'move to trash'.
Note - sometimes, the finder fails to unload the right click booster plugin, and you will get an error 'The item “Right Click Booster” can’t be moved to the Trash because some of its plugins are in use.'
Double check that you have disabled the plugin (following step one)
Restart the Finder
Click on the apple icon in the top right of your screen
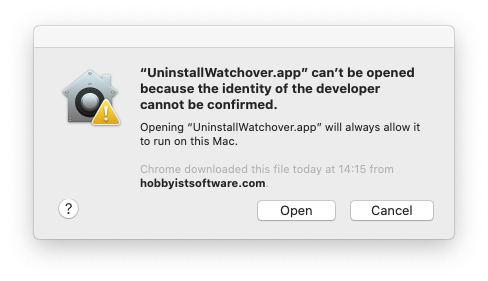
Unzip the installer so that you see 'UninstallWatchover.app' (this may happen automatically)
The uninstaller is signed, but not notarized - so you'll need to run it manually
Right click (or control click) on the application
You'll see a warning
warning message
Click 'Open'
Enter your password to allow the uninstall script to make changes
The uninstaller will run
Easter Eggs
There are a couple of features which are not suitable for everyone, but which will help some people. This page tells you how to turn them on.
Off Remote : Wake On Lan
Off Remote does actually have Wake On Lan functionality. I don't advertise the fact as I don't want to deal with support queries where people potentially have to tweak the BIOS on their PC. Equally, I don't want to get bad reviews from users who expect the functionality, then find it difficult or impossible to get it working.
If you're willing to accept that WOL might not work, then you can enable it fairly simply. Just add your computer manually from the settings page (this requires you to know what an IP address is).
In future, when your computer isn't on, then you can tap on the blue arrow and access the WOL functions.
When you set up the saved remote, you should make sure that your computer _is_ on with the Off Remote helper running. This will (probably) allow Off Remote to grab the mac address of your computer which makes the setup somewhat easier.
Go Away : Childish mode
In 'Go Away', set a custom message in the settings.
Unfortunately I can't unsubscribe for you - Apple simply doesn't provide developers with that capability.
However - I do try to make it as easy as possible in each of my apps.
To manage your subscriptions, simply click here This will launch Apple Music where Apple has (for some reason) decided to put all your subscription management.
Every app has a button linking to 'Manage Subscription'. This is typically in the settings area for iOS apps, or in Menu/Help for Mac apps.